How To Make A Bow Tutorial And Video
Happy Wednesday everyone! As promised, here is my How To Make A Bow Tutorial And Video! This is only my second tutorial and I’m in much need of some practice but I tried my best not to confuse you. I angled the camera so that it would look as if you were standing behind me looking over me rather than in front of me. I once had someone try and show me how to make a bow while standing directly in front of me and I just couldn’t get it so I taught myself. Yes, I’m self taught and hope that my instruction and videos help you to create your own bows.
I included two photos of bows that I’ve done in the past along with instructions and four videos on a smaller bow using ribbon I recently bought through Amazon.com. I tried teaching you as I would want it taught to me but if you have any questions, feel free to email me or comment below. Thursday starts my 12 Days of Christmas posts and I will be doing another video during that time on creating a bow using two different styles of ribbon at the same time. Once you get the hang of it, it’s very easy! I promise 🙂
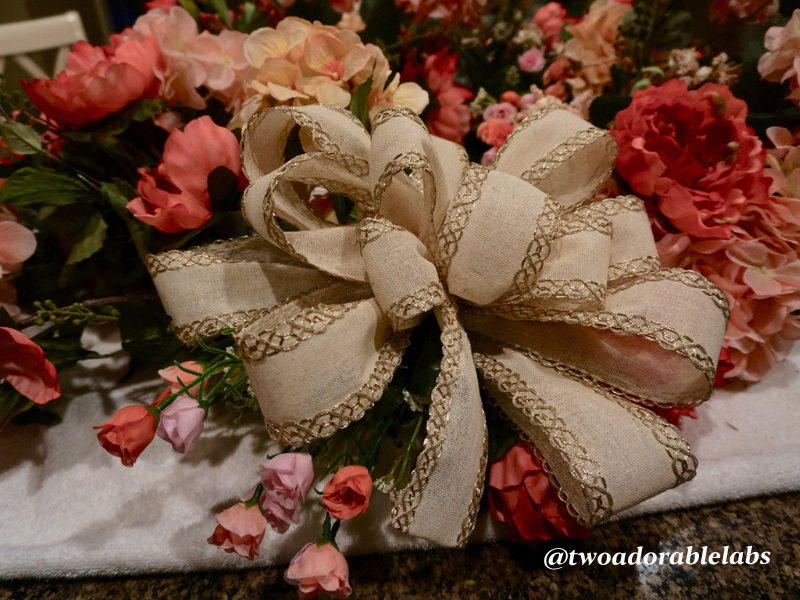
My handmade bow with 7 loops on each side
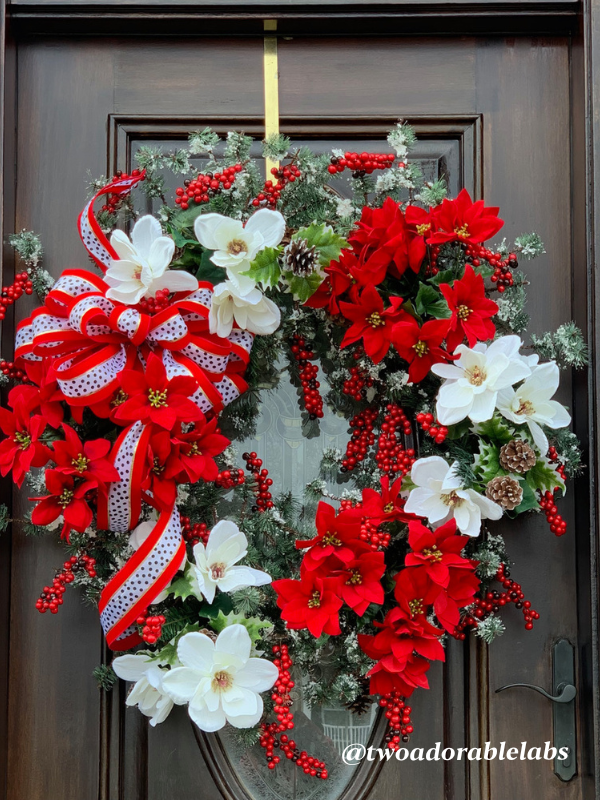
My handmade bow with 5 loops on each side
First steps to making a bow:
Step 1:
– Select your ribbon. I like to use ribbon that has a wire edge because I find it easier to create the bow. It holds it’s shape better.
– Buy a sharp pair of scissors. I bought mine at JoAnn Fabrics years ago. They have been used on so many craft projects but still remain very sharp.
– Purchase pipe cleaners or wire to tie your bow together. I normally just buy white or brown but also love to use matching pipe cleaners to my ribbon if I can. You don’t want your pipe cleaner or wire to show on your bow!
How to make a bow:
Step 2:
– First un-ravel the ribbon and pull out as much as you would like hanging down. I call these streamers. Once you get the desired length, create a small loop approximately 1 – 2 inches around (enough to fit two fingers inside of the loop) by first twisting the ribbon making sure the pattern is upright facing you, create your loop and twist together. This I call the first loop.
– Decide how big you want your bow. This will determine how many loops to make. Make sure your loops are an even number of loops on each side. Start by making your second loop and then proceed with each loop a bit bigger.
Making the loops:
Step 3:
– Pull enough ribbon out, make your loop, bring towards the middle under loop 1, scrunch and twist making sure you are holding it in your hand. If you let go, your bow will come un-done. Repeat on each side making sure you are making each loop bigger than the previous loop. The more loops, the bigger the bow.
– When your bow is finished, take your pipe cleaner and wrap it around the middle of the bow where you have twisted it all together and twist the pipe cleaner together in back. You can cut the pipe cleaner off there or leave the ends to be used for tying onto something. Maybe you are making a wreath or swag. I always make custom bows for my gifts and sometimes cut them off if they look messy.
– Decide where you want to cut the ribbon from the roll to make your steamer.
Shaping your bow:
Step 4:
– Start with loop 1 by making sure it is centered and then fan out your loops creating your bow. Make sure the loops are wrinkle free and puffy. You don’t want a deflated looking bow. Again, the more loops you have and the size of the loops, the bigger the bow.
– You can cut the streamers straight across, at an angle, or fold over at the end and cut to create a different edge. You can also use scissors with a pattern on them to cut with so the edges are fancy.
I hope my instructions were easy to follow and this has helped you create your very first bow! Again, don’t hesitate to make suggestions or ask questions! I’ll be doing another video soon with combination ribbons! It’s basically the same process only you are using two different ribbons at the same time. As long as you are able to hold the ribbons in place with one hand and twist with the other, you will be ok! Might just take some practice and you’ve got this!
Want more DIY posts? Check them out here:
DIY Ornament For Any Pet Lover
How To Create A Christmas Wreath


I’m Bobbi Jo, a lab-lover who took my passion for animals and dogs and turned it into something bigger. When I adopted Jake and Maggie, my love for them became the driving force behind Two Adorable Labs, and my blog was born. My hope is to not only share them with the world, but to help educate others on the importance of animal health and well-being.
I love hearing from all of you and do my best to respond to each and every one of you. I always enjoy your comments, feedback, and suggestions so keep them coming! If I’ve posted a recipe (for our human and our furry friends) and you try it, don’t forget to tag me on Instagram @twoadorablelabs and use #twoadorablelabs.
If you do try and love my recipes, I would greatly appreciate a comment and rating. I read every single one and respond to them. It also lets Google know that the website contains quality content. The more comments and 5-star ratings, the more Google will show my blog in search results! Thank you so much!
As an Amazon Associate, I earn from qualifying purchases.

You Might Also Like
Butternut Squash Orzo Spinach Salad With Candied Bacon
Happy Wednesday everyone! This colorful, healthy, delicious Butternut Squash Orzo Spinach Salad With Candied Bacon and a sprinkle of fresh feta cheese is a fall party favorite. But honestly, you can enjoy this salad all year long! I first saw this on Half Baked...
How To Create A Dog Safe Garden
Happy Wednesday everyone! How To Create A Dog Safe Garden. Spring is here and Mr. TAL and I have been working hard to put in new edging around the house, raised beds for plantings, and creating plans for a new shed. I have plans for a new herb garden and with...
What Are The Nutritional Stages Over A Dog’s Lifespan?
Happy Wednesday everyone! It’s been a minute since I last posted. It’s been a crazy busy time for us and it doesn’t look like it’s going to stop any time soon but I didn’t forget about you. I’m back and ready to blog! One of my loyal readers has suggested I create...
Your Dog’s Zodiac Sign
This is a re-post. I've been asked to share this post again and I'm happy to do so. I've always believed animals have amazing personalities and found this so interesting to research. Enjoy! Comment below and let me know what you think! Happy Wednesday...
New Years Table With Pink And Red Showcasing Ava’s Candles
Happy New Years!!!! I’m so excited to talk about my New Years Table With Pink And Red Showcasing Ava’s Candles!!!!! The colors on this table were inspired by the colors of my bedroom when I was a child. Yes, I had a pink and red bedroom and it was beautiful. I...
Merry Christmas
I wanted to take this time to wish all of you a Merry Christmas and thank you for all of your support, ideas, thoughts, and suggestions along the way. I have many things to be thankful for and am grateful that I have this blog which gives me the opportunity to let my...



Thank you for sharing your bow making skills. I love the video and really look forward to the 12 days. I like the written explanation with the follow up video. The over the shoulder shot was a great idea. Now I’m ready to begin!
Your nails look beautiful too!❤️
Awh this makes me so happy. I’m so glad you enjoyed the post. I should be creating another post with double ribbon here shortly. Thank you for the comment on my nails. Sassy Nails in Weirton, WV is the best!
Wow exceptional video! So we’ll explained in detail. I love the color ribbon you used too! I’m going to save this video to refer back to as I practice. Looking forward to the video when you combine different ribbons. By the way Bobbi Jo you have really pretty hands! Love you! ❤️????
Awh thank you so much! I am so glad you are saving this and can use it for later to refresh your skills! I’m glad I could help and thank you for the nice compliment about my hands. Love you!